Premium File
429 Q&A
€76.99€69.99
100% Real Salesforce CRT-450 Exam Questions & Answers, Accurate & Verified By IT Experts
Instant Download, Free Fast Updates, 99.6% Pass Rate
CRT-450 Premium File: 429 Questions & Answers
Last Update: Mar 14, 2024
CRT-450 Training Course: 78 Video Lectures
€74.99
Salesforce CRT-450 Practice Test Questions in VCE Format
| File | Votes | Size | Date |
|---|---|---|---|
File Salesforce.passguide.CRT-450.v2024-03-16.by.elsie.157q.vce |
Votes 1 |
Size 1.03 MB |
Date Mar 16, 2024 |
File Salesforce.examdumps.CRT-450.v2021-12-08.by.jack.148q.vce |
Votes 1 |
Size 1.1 MB |
Date Dec 08, 2021 |
File Salesforce.selftestengine.CRT-450.v2021-04-26.by.jasmine.137q.vce |
Votes 1 |
Size 1.04 MB |
Date Apr 28, 2021 |
File Salesforce.braindumps.CRT-450.v2020-07-02.by.darcy.78q.vce |
Votes 2 |
Size 1.11 MB |
Date Jul 02, 2020 |
Salesforce CRT-450 Practice Test Questions, Exam Dumps
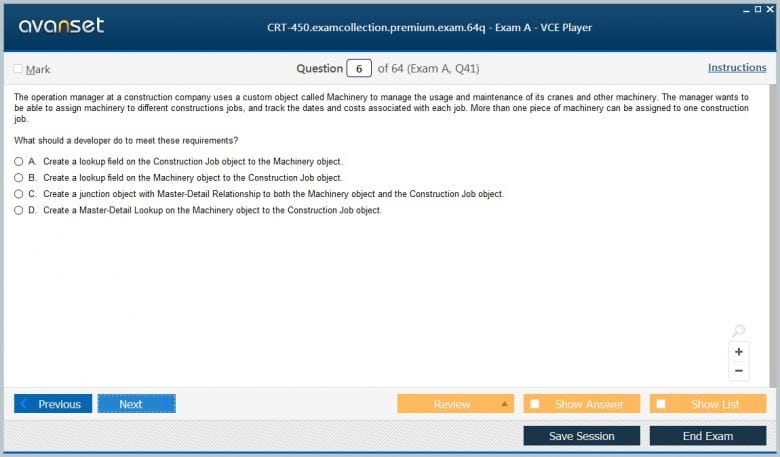
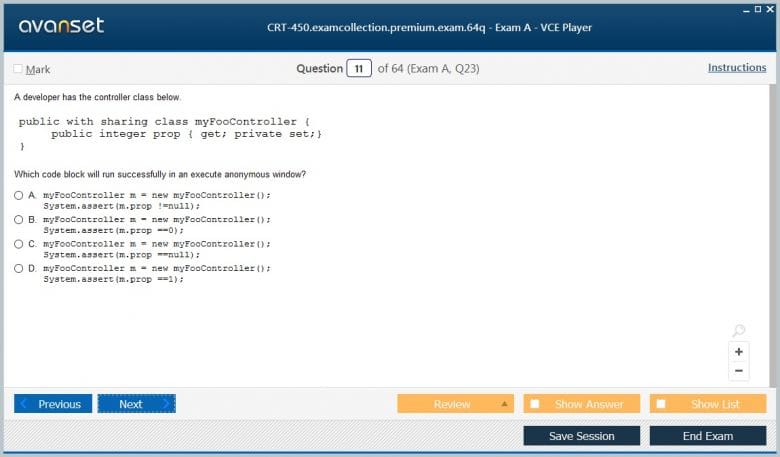
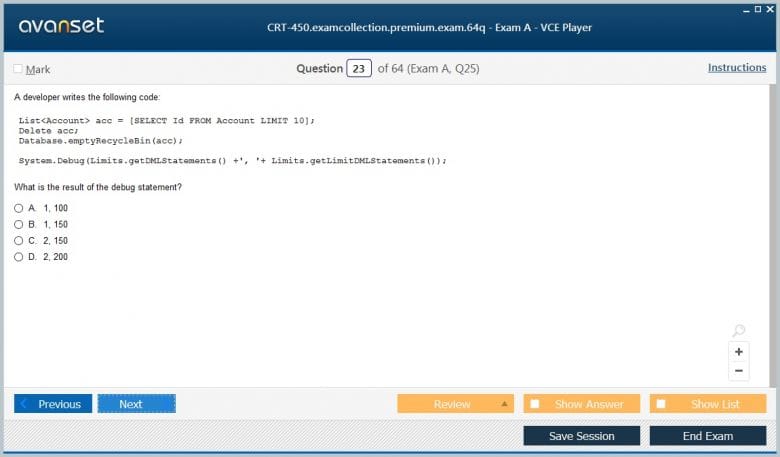
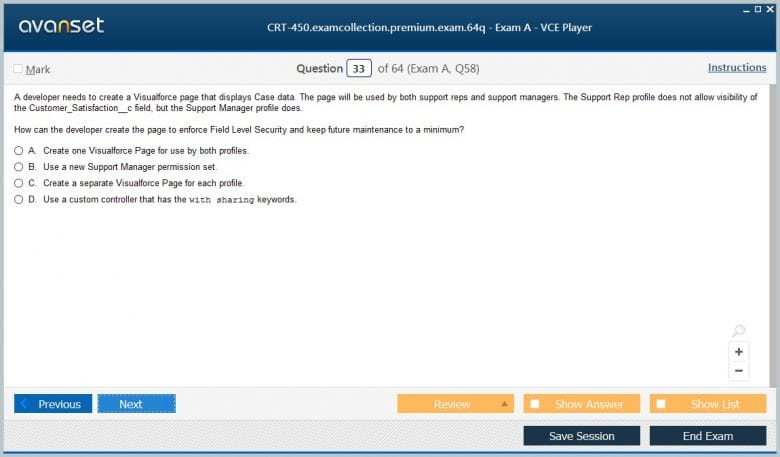
Salesforce CRT-450 Salesforce Certified Platform Developer I exam dumps vce, practice test questions, study guide & video training course to study and pass quickly and easily. Salesforce CRT-450 Salesforce Certified Platform Developer I exam dumps & practice test questions and answers. You need avanset vce exam simulator in order to study the Salesforce CRT-450 certification exam dumps & Salesforce CRT-450 practice test questions in vce format.
In this lecture, we'll talk about how Salesforce handles its data as compared to a standard database system. First of all, in a standard database system, data is stored in something called tables. Each table is composed of a number of columns. these that are of a particular datatype, like text, like numbers, like dates, and information that is stored in rows. Tables can be related to each other using primary and foreign keys. So in brief, if you have a table, this table will have a number of columns. Each one of these columns has a data type, and then you have a number of rows representing the data itself. Applications will manage this information by creating, reading, updating, and deleting rows. and that table. Let's talk about the Salesforce terminology. An object is a table in the database. It's mainly something that Salesforce tracks. just like accounts. just like opportunity. It can be a standard object, or it can be a custom object. A standard object comes out of the box with the Salesforce application, and a custom object is everything that you do. So let me give you an example. If I go to my Salesforce.org, let me login to my Salesforce.org using the Google Chrome extension. As I can see here, I have different tabs. Each one of these tabs is mostly an object. So if I click on Account, Account is an object. An object has many records, but its main purpose is to say for strikes. I also have different objects, like contacts, like opportunities, like forecasts. Then I have something called "field." What is a field? A field is a place where you store a value in an object. So back to the example. If I click on any record, I can see that the record has different fields. Each one of these stores some kind of data. So this is a field. This is also a field. This is a field. So a field can have a type, and it can also have a value. Then we have records. What is a record? Well, if I go back to the example, if I click on the Account object and if I click on the allaccount, I can see that I have all these records. These are all account records. And if I click on each one of the account records, I can see the record itself, the values, and the different fields of this record. So now we do understand what an object, a field, and a record are. What is a.n.org? An.org, as wementioned before, is an organization. It has a unique ID, and it has the different data, the different metadata, of your own company. What is Force.com? Force.com is the platform that is used to build any Salesforce application, including the CRM standard applications. What is an application? An application is simply a set of different objects and different permissions that you use in Salesforce. So let me go back to salesforce.org. As you can see on the top right, I have different applications. If I click on any one of these applications, like the Service application, I can have different objects. So an app is simply a collection of tabs and objects. Then finally, what is a tab? A tab is a container that, when you click on it, will display the object. So, going back to Salesforce, this is a tab. When I click on the tab, I can see the object. So this is the object that is called Solutions. It uses a tab called Solutions. and if I click on this tab, I will display the data of this object. So, if I go to Accounts and click on the Account tab, I'll open the Account object, and in that countobject, I'll be able to see the different records of the account. And if I click on a record, I can see the different fields of this account object. Based on that, we can say that the database and the Force.com platform use objects to store their data. Objects are equivalent to tables. But on top of that, there are some additional enhancements that make objects more powerful than tables. For example, there are the auto fields, the validation rules, and the automation tools. Each object has a number of fields. These are equivalent to columns in a database. Data is stored in something called "records." and these are equivalent to rows in a database. We can see on the right side that we have an Excelsheet, and we have a Salesforce object at the bottom. So a Salesforce object is very much comparable to anExcel sheet, but of course, with much more enhancements. There are two types of Salesforce objects. First, we have the standard objects. These are built in objects. They come by default in the application. They come by default in the Sales Cloud or in the Service Cloud. As an example, we have the Account object, the Opportunity object, the Lead object, the Contact object, and so on. Then we have custom objects. These are objects that you create for yourself. So they are used to extend the functionality of the standard objects. And you can also create applications based onstandard objects as well as on custom objects. Now, let's talk about the object fields. Each standard or custom object consists of a different number of fields. There are many types of fields. First of all, we have the ID. The ID is a unique identifier for every Salesforce record. So let's say you have created an account record. This account will get an ID, and this ID is unique. Then we have the system fields. When you create any record, it will automatically get these fields. We know when and by whom it was created. We have the "last modified" date and the "last modified by." These fields are created automatically when you create a record. We also have custom fields. These are fields that you can add to standard or custom objects. They can extend the functionality of the object itself. They can be text field, they can benumber field, picklist field and so on. Finally, we have the relationship fields. As we have mentioned, in a relationship database system, if we need to relate to tables, we use primary keys and foreign keys. This is not the case at Salesforce. In Salesforce, to do that and link two different objects, we use something called relationship fields. We have two different types of relationship fields. We have the local field, and we have the master detail field. We'll talk about these two fields in detail in the next lecture. For now, let's do an application, let's do some objects, and let's create some fields within these objects. What we'll do is create an application called the Books Cloud Application. This application will contain these objects. We'll have the book object, the review object, the author object, the publisher object, and the bookstore object. And we'll also create different fields in each one of these objects. So this is the layout of our application. We have five objects. Let's jump into Salesforce to do the application and to do one of these five objects. So this is Salesforce. This is the setup page. To create an application, we must first visit builda. Create, click on Apps, and then click on New. Let's keep the custom app. And we'll call this app BooksCloud. Next we'll choose an image. I have uploaded a logo to Salesforce.org. I will choose it now, and I will click on Next. Then I will choose which objects are in this app. For now, we just have the Home object. Now let me give permission to each profile, and that's it. So, we have created our app. This is the Books.Cloud app. Now let's create one of the objects. Let's create the book object. So we'll go to the objects, and then we'll click on "New custom object." So, this object will be called Book Name. Field will be called a book name, and it will be text. We will allow reporting, we will allowtracking of the field and chatter. And then we will also allow searching. And let's click on this last option, which will launch the custom tab with it. So click on "Save." So this is it. We have created our object. Now let's choose a tab that will launch this object. I think there's a book icon. Yeah, this is it. So let me choose this tab icon, and let me click on Next. So I will keep the default on for each one of the profiles. Click on Next, and then I will select which app will hold this object. In this case, I will have only the Books Cloud app only.Click on Save, and that's it. Now we have an object and we have an app. Let's go to the app cloud. As you can see, we have our logo, we have the Home object, and we have the Books object. Now let's add fields to the books object. To do so, let's go to the setup menu. Let's click on Create Objects andlet's click on our object. Notice here the automatic fields. Click on "you" under "custom fields." Let's first create an auto number field, whichwill be the ID of the book. So let's call this book ID, and the format of this ID will be B, then Dash. Then we'll have the number, and it will start with the number one. Click on "next." Let's make this field visible to all profiles. And then let's create a new field. So it will now be a Pick List field. This pick list field will be called Type, and it will not use a global pick list. And let's make it visible to all profiles. Click on "next." Save and new. Let's create one more field. Let's add a date field. Let's call this field "publishing date." So now we have created three extra fields. So these fields will now be visible on the object box. So if I click now on you, I can see that I have the book name, the type, and the publishing date, but I cannot see the book ID because this is a read-only field. I can see it when I create a record. So I will also create other fields offline, and I will show you these fields as well as the other objects once everything is done. But for now, this is just a brief demo on how to create an application, an object, and some fields. So let me go back to the slides. So we have created one object and some of its fields. The other objects and fields will be completed offline. Finally, as a summary in this chapter, you have learned about the data modelling used in Salesforce, as opposed to the data modelling used in the standard database system. You have learned about objects, about fields, and about records. We have created an application with one object until now and three fields. What I will do offline is create the other objects as well as all the fields. And the next chapter will take this application further; it will create different relationships between different objects in this application, and you will understand the difference between a lookup relationship and a master detail relationship. Finally, as usual, thanks for watching.
In this lecture, we'll talk about the different relationships in Salesforce and how we can link our objects together. Before that, let's go to our Salesforce.org site and let me show you my Books Cloud Application. So this is what I did. I did an application called Books Cloud, and what we did during the last lecture was create an object called a book. I created three fields in this object, and then offline I did add some fields, and then I added some records. So this is the object of the book. It has a name, it has an ID, it has the system field, it has the type, pick list, publishing date, book cover, book summary, and that's it. And then I did something called "author." This is basically the same thing as reviews, bookstores, and publishers. But, until now, there was no connection between these objects. Each of these objects is completely independent of the others. What are relationships? A relationship is a two-way association between two objects. Without relationships, you could build as many custom objects as you wanted, but each of these objects would be totally independent and not related to the other object.With relationships, we can display data about other related objects on a particular detailed page of one object. So in the case of our application and the objectbook, I need to display the author of this book. How do I do that? I first need to relate the book to the author, and then I can display the author and the book object. Before that, let me give you a brief introduction to the entity relationship association model. We have three kinds of association. First we have the one-to-one association. We have one to many and many to one relationships. In the case of husband and wife, how can we build the association? First we need to associate these two objects, and then we can determine what kind of association it is it.So let's start with the right-side object, which is my wife. A wife can have one husband. So on the left side, we have one. Then a husband can have one wife. This means that on the right side, we also have one. This is a one-to-one association. In the case of "one too many" or "many to one," let's start with the "one too many" football team and footballers. So to build this association, start on the right side. A footballer can have only one football team, so the one on the left will be one. A football team can have many footballers. On the right side, we have many. So this is a one-to-many association. In the case of footballers on the left and footballers on the right, we'll start with the football team. A football team can have many footballers, so there will be many. Then a football player can have only one football team. It will be one to the right. So it's many to one. Finally, we have the many-to-many relationship association. In the case of students and subjects, a subject can have many students. A student can have many subjects, so this is the "many to many" association. So let's look at these examples. Let's try to determine the different relationships and associations between these pairs of objects. Let's start with the first one: author and book. To build this association, we need to start with the right-most object. In this case, a book. How many authors can there be in a book? A book can have only one author. so we start this association with one. And then an author has many books, so this is a one-too-many association. So we determine that the rightmost side of this relationship is "many." So this is a one-to-many association. The object on the many side is the child object. The same goes for the publisher and the book. How many publishers can a book have? It can have only one publisher. So we start with one, and a publisher can have however many books he wants. He can have more than one book. So this is also a one-to-many relationship. So the parent is the publisher, and the child is the book. Now, between book and review, a review can be associated with how many books it has read. A book can have how many reviews? It can have more than one review. So this is also a one-to-one association. Finally, how many books can a bookstore have; it can have more than one book. As a result, this relationship association should begin with a large number of people. How many bookstores can a book have? It can be in more than one book store. So this is a money-too-many association. So in this case, the parent will see that later on. Now, let's go back to SalesForce. In Salesforce, we don't deal with primary and foreign keys as we stated in our last lecture; we deal with relationship fields. How do we link two objects? We have two different types of relationship fields. First, we have the lookup relation, and then we have the master detail relation. A lookup relationship is appropriate when you have a relationship between two objects that is not tight. And then a master detail relationship is appropriate when you have a relationship between two objects that is tight. I will explain that in detail. So to relate to objects, let's say account and opportunity. First, we need to determine if the parents and the child object. In our last slide, you mentioned that to determine the parent and the child object, we needed to check who was the object on each side. So in this case, opportunity can have only one account. An account can have many opportunities. So this is a one-too-many relationship, and the many-size object is the opportunity. In this case, the opportunity is the child object. How do we build the relationship? We can build the relationship and the child's object. So we can create a field and a child object. This field can be a type, lookup, or master detail. And then we can link this field to the parent object. So now what's the difference between a lookup relationship and a master detail relationship? First, the similarities. Both relationships will create a link between one object and another object. Both relationships will be created on the child object, and we'll have a related list created on the parent object when we create this link from the child object. Now, the differences in the lookup relationship are that both objects are loosely related. But in the case of master detailrelationship, both objects are tightly related. What does this mean? So let me give you an example. In the case of, let's say, a movie and a review, there is a relationship between these two objects. A review cannot exist without a movie. So in this case, I need a tight relationship between review and movie. Because if I delete a movie, I also have to delete the reviews. The reviews are totally dependent on the movie. So the next thing is the ownership and the sharing. In the case of a lookup relationship, the two objects' ownership and sharing permissions are totally independent. But in the case of a master-detail relationship, the ownership and the sharing permissions are linked. So in the case of movie and review, the review object has a master detail relationship to the movie object. So in this case, it will inherit the ownership and the sharing permissions of the movie object. I cannot specify its own ownership and sharing permissions. I can delete two records that are related via a lookup relationship independently. But in the case of a master-detail relationship, if I delete a master record, all of its detailed records will also get deleted. And finally, in the case of a lookup relationship, the lookup field and the child object are optional. But in the case of master detail, the field and the master detail relationship are mandatory. Now, about money to many how we can relate to objectsby many to In our last example, we had two objects that are related via a great many relationships. These two objects are the bookstore object and the book object. In many relationships, how can we relate to objects in many relationships?To do that, we use something called a junction object. A junction object is simply a custom object that has two master detailed relationships with both objects. We cannot link directly to objects via many-to-many many relationship.We can only link them via a junction object. To do that, we simply create an object between the two objects, and this object will be a child for both objects. So in the case of books and bookstores, as we have mentioned, we cannot create a direct many-to-many relationship between books and bookstores. We need to have a junction object. In this case, let's call this object "selling," and this object will be a child object of both book and bookstore via a master detailed relationship. We also have other types of relationships that we have to talk about. First, we have the hierarchical relationship. This is a special lookup relationship that is only available on the user object. It lets you use a lookup field to associate one user with another user. Then we have the external lookup. This is mainly to link a child sender's external object to a parent's external object. And finally, we have the indirect lookup. This is mainly to link a child external object to a parent standard or custom object. All these relationships use the lookup field. Now let's go back to our BooksCloud application and the last lecture. We have built an application with five different objects. These objects are still not related to each other's. Now we need to relate the objects to each others. How many books can an author have? He can have more than one book. But a book can only have one author. So this is a many-to-one relationship. A publisher can now have how many books in the case of a book and publisher. It can have more than one book. So we have many sides. But a book can only have one publisher. So this is also a menu toone relationship between book and review. A review can be associated to how many books. It can be associated with only one book. So we have one side on the right side. But a book can have many reviews. So this is a many-to-one association between review and book, and a many-to-many association between book and review. Finally, how many books can a bookstore have between books and bookstores? It can have more than one book. A book can be in more than one book store. So we have many to many association. But wait, we cannot have this kind of association in a database. We need to create a junction object. For that. We'll make a selling object out of the two objects, book and bookstore. And this object will be a child of both book and bookstore objects. Let's go to salesforce to do that. But before that, let's determine what kind of field will be created on the object. First, let's start with the book object. The book object is a child object of both the author object and the publisher object. So in this case, we need to create a lookup field and a book object that links to the author object. And also, we need to create another lookup field that links to the publisher object. Then author is not child of any object,publisher is not child of any object. The book object's child is the review. So in this case, we need to create a relationship field on the review object. But what kind of field do we have to create? In this case, we have to create a master detail field. Why? Because the review is tightly bound to the book object But in the case of author and publisher, we created a lookup relationship because an author is not tightly linked to a book, and the same is true for a publisher. Then the bookstore object is not a child of any object. Finally, the selling object is a child of the book object as well as the bookstore object. So in this case we need to createa master detail relationship to the book objectas well as to the bookstore object. Why am I going into so much detail? because this is a junction object. Let's jump into Salesforce and let's create these objects. Let's first jump into the book object. Let's go to the object itself, and let's create the field. So it will be a custom field, it will be a lookup field, and it will relate to the author object. Field names will also be the same. Let's make it author, and I will make this visible to all the profiles. And finally, I will also create a field in the page layout, and this is the related list. I will also create a related list, and then I will click on Save and New. So what other field do I need to create on the book object? I need to create a lookup field for the publisher object. Let's go to the Lookup Relationship field. So in this case, it will be related to the publisher object. So I will use the same name. Now I have two relationship fields and book objects. Let me go to the page layout of the book object and let me place these fields. So I have the author feel; I will place it there, and I will place the publisher field on the right side, and I will click on save. Let me now go to the bookobject, and let me open a record. Notice that now I have two fields—two extra fields—to look up fields.If I click on edit, I can choose the author of this book from the author object. So the author of this book is, in fact, Stephen Hawking, and the publisher is someone I really don't know. So I will choose any publisher, and I will click on save. Now that I have a URL, I can click on it to get the information from the Steven Hawking record, which is an author record. And also on this object, I can have a related list called books. This is the last step in the field's creation, as we mentioned. Let me go back to the book object and let me choose another book, and let me link this book to the author and to the publisher. So in this case, I will link this book to this author, and I will link it to any publisher but Amazon. Now if I open the book, I can see that it's now linked to an author and to a publisher. And if I go to the author or to the publisher, they object. I can see that there is a related list. So let me open this record and see. This is the related list because it can contain multiple books. Finally, as a summary of this lecture, you have learned about the entity relationship model. The different associations are one to one, too many to one, and many too many. You have learned about the different relationship fields in SalesForce. What's the difference between a lookup field and a master detail field? And finally, we have established a relationship between the book object and two other objects. I will complete the other relationships offline, and I will show you the result later on. As usual, thanks for watching.
As we have seen in the previous lectures, we can do a lot of things using the user interface. We can define our whole schema using the UI. We can create an app. We can create different objects in this app. We can create different fields in each one of these objects. We can also connect these objects with relationship fields such as the LookupRelationship or the Master Detail Relationship. Now, when we create these, what will be the impact on Apex? Can we use these in Apex? Let's see. On the next slide, when we defineanything using the User interface, it becomesavailable to be used in your code. So whenever we click on the Save button, after creating an object or a field, just after we click on the Save button, we can use this object or this field and our Apex code. We can also use this in our software statements. Let me give you an example. Let me go back to my Salesforce.org. And in our Salesforce.org, we have created an application called the Books Cloud, and we have created these five objects. Let me open something called the Developer Console. You'll know about this in detail in Section Three of this course. But for now, I will just show you. This is the Execute Anonymous window. This is mainly used to execute any Apex code. And this will affect the salesforce or directly. So, in this anonymous window, I'll run some code. This code will insert a book record into my Salesforce. Or this is just to show you that once I create an object or a field and the UI, it becomes available in Apex. So let me create a record. how to do that. You'll see that in detail in Section Number Three. So, these three lines of code should generate a newbook record called "Field My Book One." And then they will insert this into Salesforce. Let me click on Execute and let me see if Apex will recognise the book object, which is a custom object. and if Apex will also insert this record or not. Let me now go back to the Salesforce.org site and see if I have a new book record or not. I will click on All Books and see if I have this new book. Yes, I have it here. So Apex is now used to insert My Book One. This means that anything that I define using the UI becomes directly available to be used in Apex. Now, let me go back to the slides. What if we change anything using the UI? What will happen to Apex? What effect will this have on the Apex code? So when you modify anything using the UI, any modification that you do in the UI will be reflected in Apex. a very important note. You cannot delete or edit any field that is already referenced by Apex. So if, let's say, you have an Apex class, this class is linked to one of your fields and one of your objects. You cannot modify this field, and you cannot delete it because it's already used in Apex. Now let me change something in the UI, and let's see if this will reflect in Apex or not. So in the book object, let me make one of the fields required. to do that. I will go to view the fields. And let's say that I want the Type field to be mandatory. So I will go to the Type field, and then I will make this field mandatory. I will click on Edit, and I will check this box. Click on "Save." Now let me go back to my ApexCode, let me open the developer console, and let me try to insert another record. So this will be my book too. What will happen now? Do you think it will work or not? Let's try to execute this, and let's see the output. What will happen? We received a DML exception indicating that the insert had failed. Why? because one of the required fields was not defined. So this will show you that any changes that we make to our UI will be directly reflected on Apex. Let me go back to what I will do now. I will insert the second field. So, in this case, type Book One, underscore Equal. And now let's also change the name from Book One to Book Two. And we'll see if this works or not. It will execute. So now in Salesforce, I need to go and check if this record has been created or not. Let me go to Salesforce. Let me open all books, and let me see if I have Book Two. Yes, I have it here. I have a new record called BookTwo, and it is of the science genre. I click on this book, and I can see that this book has the name My Book too. This is the same name that I had defined in the Apex code. So, going back to the slides, this is a small chapter. So this is mainly to show you that anything that you do in the UI will be directly reflected in Apex. So finally, as a summary of this lecture, you have learned about what the schema design modification impacts on Apex development. You have learned that anything that you do in the UI will be directly reflected in Apex. And any change that you make in the UI will also be directly reflected. And one important note that you need to know is that if there is any field that is referenced by any Apexclass, you cannot modify or delete this field using the UI. And finally, as always, thanks for watching.
In this lecture, we'll talk about the schema builder. The schema builder is a tool that is used to view and modify your sales force or data model visually. It simplifies the task of designing, implementing, and modifying your data model or your schema. With the schema builder, you can view your existing schema, and you can add new custom objects and custom fields. You can add relationships just by dragging and dropping. You don't need to open any pages. You don't need to go to the object page to go to the field page. You do everything in one place, which is the schema builder. The schema builder is enabled by default, and it will let you do it. First, you can jump directly to an object page and to an object layout page. Then you can create any custom object with the schema builder. By just dragging and dropping the object from the left pane from the elements pane to the main pane, you can delete custom objects from the schema builder. You can edit custom object properties from the schema builder. You can create any new custom field using the schema builder on custom objects or on standard objects except for the geolocation field. You can also delete custom fields. The schema builder will automatically implement the changes, and it will also save the layout of your schema anytime you move an object. So let's say you have created a new object using the schema builder. As soon as you close the schema builder, you will find this object available in your Salesforce.org. This eliminates the need to navigate from the object page to the layout page to click on multiple pages; you do everything from a single location. The schema builder also provides details like the field values and required fields, and it will let you know how objects are related to each other's.So if there's a line between two objects, you can know that these two objects are related. If this line is red, the relationship type must be detailed. If this line is blue, the relationship type is lookup. You can also know which child object is on the line. And this is all applicable to both standard and custom objects. Two important notes here: any field that you add through the schema builder is not automatically added to the page layout. So let's say you have added a field called typefield, which is a text field, to an object. As soon as you leave the schema builder, you will notice that this field is not available on the object page layout. You have to go to the object page layout, and you have to add this field to the object layout. Another note by default: the feed level security for custom fields is set to visible and editable. If you want to change these, you have to go to the object page, to field-level security, or to the page layout and change this. Fields that are not normally editable, like the formula field or the roll-up summary field, are set to visible and to lead. One good point here for the schema builder is that you can go directly to the field-level security page from the schema builder. So what you can do is, as soon as you create a field in the schema builder, you can just click on the field and go to its field permission page. Now let's talk about our application. We made this application. It has these six objects. Let's go to salesforce.org and see how this application and the schema builders work, so let me go to salesforce.org. I will log in to salesforce.org and then go to the schema builder, just search for the word "schema," and click on the link for the schema builder under "Build." There you go. Now you can see all your other objects. Let's select the object of the custom application that you have made. There you go. Now you can see the different objects of the custom application. It's exactly the same design that we've made in the PowerPoint slide. There you go. So we have the book object, which is a child of the author object, which is also a child of the publisher object, and then we have the junction object selling and then we have the review object, which is a child of the book object, and the relationship between these two is a master detail. So there you go. The red lines are master detail relationships and the blue lines are lookup relationships. Let us take the purchase of a book as an example. I can hide the object from the canvas; I can edit the object properties. So this is the same page as the object page. I can also delete this object. This is only available for the custom objects, and then I can do two things I can open the object page directly from the schema builder, and I can also open the page layout. So if I click on this link, I will have a new window open, and the page layout will be the same. So in this case, I don't need to go back to the salesforce or go back to the setup menu to search for the object and then go to the object page or to the page layout. I can do that directly from the schema builder. So now let's try to add an object. To do that, let's go to the elements tab and drag the object element to the canvas, and there we can name our object and we can give it the properties that we want, just like on the setup page. I can also add any fieldto any custom or standard object. I can see on the elements tab that I have all the field types except for the geolocation field. To do that, just drag the field and drop it inside the object. So, email feed, let's go ahead and add the email feed to the author, and then save. So now we have added a field to the author object, just like we did before with the other field. But now through the schema builder, as Ihave told you, the field will not beautomatically added to the page layout. For that, we need to go to the page layout of the author object and add this field to the page layout. This is the only drawback of the schema builder. So let me click on the top right icon and let me go to the author page layout from the schema builder. So let's go to the fields, and let's see. Yes, we have an author email field that's not automatically added to the page layout. I can drag and drop it anywhere that I want on the layout. So let's add this field to the layout. I will add it under the author name field, and then I will click on Save. Let's open the author object and let me open any record. There you go. As you can see, I now have an email field going back to the schema builder. Let me just add a standard object, the accountobject, and let me show you that I can do the same thing using the schema builder. I can hide this object from the canvas, I canview the object and I can view the page layout. But what I cannot do is delete the object, and I cannot edit the object properties because this is a standard object. But I can always add any feed that I want to this object. So this is the Schema Builder. It's a very nice tool. You can use it instead of using the setup menu. The only drawback is that you need to add the field to the page layout after creating it, and you need to adjust the field level security after creating the field. And finally, as a summary in this chapter, you have learned about the Schema Builder, which is a tool that is used to view and modify your Salesforce schema. You can view your existing schema, you can edit the objects, you can add new custom objects, you can add new fields to both standard and custom objects, and you can also add relationships between these objects. One important thing: as soon as you save anything using the schema builder, it will become available to be used in your salesforce.org, and it will also become available in your Apex code. And finally, as usual, thanks for watching.
In this lecture we'll mainly talk about howwe can import data into our salesforce environmentand how we can export it. What are the different tools that we can use? And finally, we'll jump into Salesforce, and we'll show you how to do that. First, importing data into Salesforce is a very easy process. You can easily import external data into Salesforce. The supported data sources include any programme that can save data in a CSV file. So if you have any software that produces data in CSV files, you can use this file as input to Salesforce to do the import. Or you can always write your own CSV file. Salesforce offers two different ways to import data. First we have the data import wizards, and then we have the data loader. Of course, there are other applications that you can use to import data into Salesforce, like, for example, the Data Logger IO and many different apps in the App Exchange. But I will not talk about this. I will only talk about the two main tools that Salesforce users use. First we have the data import wizard and then the data loader. First. We start with the data import wizard. This is a browser-based wizard that you can access from the setup menu of your Salesforce.org. You can log in to Salesforce.org and then go to the setup menu, and from there you can access the Data Import Wizard. Data Import Wizard lets you import records for four standard objects, which are account, contact, lead, and solution. And it lets you import records for any custom objects. Data Import Wizards has a very simple interface, and you can import up to 50,000 records at one time. Finally, the two big advantages of Data Import Wizardare first of all, you can detect and youcan avoid duplicates using the Data Import Wizard. Secondly, you can easily deactivate the workflow rules just before starting the data import. Using the Data Import Wizard, the second tool that we'll talk about is the Data Loader. The Data loader is a clientbased application. You can easily download the dataloader from the set-up menu. You just need to log in to Salesforce. Organized from there, you go to the set-up menu, and then you go to administer. And after that, you choose the data loader. The data loader lets you import data into any object, so there is no restriction whatsoever in the data loader. It can be operated through the graphical user interface as well as through the command line interface, which means that you can create any script that automates the import process. The data loader can import up to 5 million records at one time. This is a huge improvement over the data import user, which will import only up to 500 records. the two drawbacks of the data loader. First of all, unlike the DataImport Wizard, it cannot avoid duplication. So it cannot detect duplicates, and it cannot avoid them. The second point is that it cannot deactivate theworkflow rules just like the Data Export Wizard can. When to use the Data Import Wizard: Well, use the Data Export Wizard whenever you have fewer than 500 records to import at a time, and the objects should be part of these four standard objects or of any custom object. And finally, you cannot automate anything using the Data Import Wizard. You can only go to the setup menu, choose Data Import Wizard, and start your import. There is no automation here whatsoever. When to Use the Data Loader Well, if you need to import more than 50,000 records and less than 5 million records at a time, you have to use the data loader. The second point is, if you have to import records into objects that are not supported by the DataImport Wizard, you have to use the data loader. And finally, if you have requirements to automate your import process, like, say, importing data into Salesforce every midnight, you have to use the data loader and the command-line interface. You need to create a script, and then the script will be running automatically. Now, this is a comparison table between the Data Import Wizard on the left and the Data Loader on the right. The first point The data import wizard is embedded into salesforce.org. You just need to log in to Salesforce, and from there, you choose the Data Import Wizard and run your data import. The Data Loader is an application. It should be downloaded, and it should be installed on your PC. And there's also a requirement for the application to run. It needs the Java runtime environment 32 bit.The second point is that the Data Import Wizard is only for importing up to 500 records at a time. But the Data Loader can import up to 5 million records at one time. The data importer supports only four standard objects. It supports the account, object, contact, lead, and solution. But the Data Loader supports any kind of object, be it standard or custom. The Data Import Wizard cannot use the Delete operation, but the data itself can use the Delete operation. Using the Data Import Wizard, you can easily deactivate the workflow rules just before starting your data import, but this is not the case. Using the Data Loader, you need to make sure that the workflow rules are deactivated. You have to go to each one of these workflow rules and deactivate them before running your data loader using the Data Import Wizard. And while importing duplicates can be detected and avoided, this is not the case. The Data ImportWizard cannot be used in a command-line interface when using the data loader. It does not have this option. But this option is available using the Data Loader. And finally, the Data Importer does not have a feature to automatically schedule your imports. But this feature is available in the Data Loader through the command line interface option of the Data Loader. Just like importing data, you can easily export records from Salesforce to CSV files. There are two main methods for exporting data. First, we'll talk about the Salesforce data export, and then we'll talk about the data router. Let's start with the Salesforce data export. This is an in-browser tool. It's accessible through the setup menu, and it's very simple to use, just like the Data Import Wizard. It lets you export any object records, and it lets you export data manually once every six days or every 28 days. And it has a feature for automatic export of data. You can schedule automatic exports every week or every month, depending on your edition. When an export is done and ready for download, you will receive an email containing the link to download the export. And you will also get the same link in the Salesforce data export. The next tool is the data loader. We did talk about the data loader. This is a client application that you need to download on your PC and install. And then it will use the API to access your Salesforce.org. In addition to importing data, the Data Loader lets you export any data to any CSV file. It can be operated through the GUI or through the command-line interface. This is a composite table between the Data Export on the left and the Data Roller on the right. First, the data export is embedded in your salesforce.org. You have to access it through the setup menu, just like the data import users. But the Data Loader is a client application that you need to download and install on your PC and access your Salesforce.org using the API. Both tools support exporting all objects. There is no restriction here. The Data Export cannot be operated via a command-line interface, but this can be done through the Data Loader. You can schedule exporting data using Data Export. You can do it once every week or once every month. same thing in the data loader, but there is no restriction on the schedule. You can schedule data exporting using the Data Loader anytime that you want. Now, let's go to our salesforce.org site, and let me show you these tools in action.
Go to testing centre with ease on our mind when you use Salesforce CRT-450 vce exam dumps, practice test questions and answers. Salesforce CRT-450 Salesforce Certified Platform Developer I certification practice test questions and answers, study guide, exam dumps and video training course in vce format to help you study with ease. Prepare with confidence and study using Salesforce CRT-450 exam dumps & practice test questions and answers vce from ExamCollection.
Purchase Individually
Salesforce CRT-450 Video Course
Top Salesforce Certification Exams
Site Search:
SPECIAL OFFER: GET 10% OFF
Pass your Exam with ExamCollection's PREMIUM files!
SPECIAL OFFER: GET 10% OFF
Use Discount Code:
MIN10OFF
A confirmation link was sent to your e-mail.
Please check your mailbox for a message from support@examcollection.com and follow the directions.
Download Free Demo of VCE Exam Simulator
Experience Avanset VCE Exam Simulator for yourself.
Simply submit your e-mail address below to get started with our interactive software demo of your free trial.
Add Comment
Feel Free to Post Your Comments About EamCollection VCE Files which Include Salesforce CRT-450 Exam Dumps, Practice Test Questions & Answers.